How to Adjust Color, Saturation, and Hue in Photoshop Elements
Photoshop Elements by Adobe offers several great editing features, but learning how to best use them may take several months. If you want to make a picture attractive with your editing skills instantly, then color adjustment, Saturation, and hue changes are enough. Let’s check out how to adjust color, saturation, and hue in Photoshop Elements.
Things to Consider Before Applying Saturation
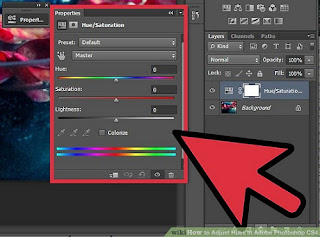
Saturation helps adjust the color and adds clarity. It makes a significant impact on the whole picture. Use the Saturation slider to make the color look sharper. If any color ruins your whole picture, you can decrease its tone. Use the Lightness slider to add light to the picture. In addition to it, You can add darkness to some parts of a picture. Avoid using it on the entire image as it may affect the whole picture.
Modify Hue and Saturation
The first step is to choose “Enhance,” then click on “Adjust the Color,” and then click on “Adjust Hue/Saturation.” Choose a New Adjustment Layer. Open the Saturation Layer. You can select any color from those available on the Edit Menu. Now is the time to drag the Adjustment slider. Drag it to adjust the amount of the color. You can drag one of the triangles to make adjustments to the color of a picture. You can drag one of the gray bars to modify the amount of color. To edit the range, you can choose a color picker. It can help make colors more vivid. Color picker – is used to decrease the color. Color picker + is used to increase the color. The feature works in different ways on Windows and Mac.
Adjust the Color of the Skin Tone
Photoshop lets you adjust the color of skin tone and shows that you are naturally good-looking. To change the color of skin tones, All you need to do is click on any particular area of skin in a photo. The “Adjust Color for Skin Tone” feature will allow you to adjust the skin tone color manually. You can add natural color to a person’s skin in a photo using the tool. Tan and Blush colors can be used for enhancing skin tone. In addition to it, you can increase or decrease the temperature in a photo.
Adjust Saturation of a Specific Area
You can adjust the Saturation of a particular area in a photo using the Sponge tool available on Photoshop. Select the Sponge tool and set tool options. Now you can increase or decrease Saturation. Set the brush size and brush the area that you want to add the Saturation to. In addition to it, you can enter the value for the amount of Saturation.
Modify the Color of an Object
Modifying the color of an object is easy in Photoshop elements. The “Replace Color” is a fantastic feature that lets you change the color of an object in just a few simple steps. In addition to it, you can apply Hue and Saturation to the color of the object. The first step is to choose Enhance, then click on the Adjust Color. You need to click on “Replace Color.” You will find a display option under the image. You can find the Color picker in the section. Click on the Color picker tool. You can use Color picker + and color – to either add or remove the colors.
Turn into Black and White
Sometimes, you may need a black and white photo. The “Convert To Black And White” feature on Photoshop Elements changes a picture into black and white color. All you have to do is go to the “Convert To Black And White” dialog box, and you can choose any presets you like. You can put the sliders to use to enhance the photo.
These were some useful tips on how to adjust Saturation, Color, and Hue in Photoshop Elements.


Comments
Post a Comment